Upload My Wordpress Site to Server With a Plugin
Worried that shifting your WordPress site to an online server won't piece of work?
You're right to be. If migration is washed incorrectly, information technology could cause errors that are hard to find and resolve.
Many surrender on moving WordPress from a localhost to a server because it's just too hard.
That said, there is a mode to do it without any hiccups.
Nosotros'll show you lot the right tools to use and requite y'all step-by-footstep instructions so that your WordPress site is up and running on a server in no fourth dimension.
TL;DR –
The easiest and safest manner to migrate your site from localhost to server is using a plugin like All-in-one migration. Install the plugin on your local site and export your site's files. Adjacent, install the plugin on your new WordPress site on your alive server and import the same files. Later on you're done, make sure you lot fill-in your WordPress site then that you lot always take a safety net to fall back on when things go wrong.
Getting Started on Moving WordPress from Localhost to Server
At that place are a few different scenarios where yous would desire to move your site from localhost to server:
1. You've set up WordPress on your device and congenital a new site locally.
2. You have a backup or a package of an old site that you desire to bring to life again.
3. You lot've already tried moving your site and are facing errors.
Nosotros've covered all 3 scenarios past detailing the safest error-free method. We likewise testify you other methods,the errors you may encounter, and how to prepare them.
To brainstorm, when you want to move your site from a localhost to a live server, y'all first need three things:
- A domain proper noun
- A hosting plan
- A WordPress Installation
If you have this in place, skip ahead to the steps. If you don't already have these basics in place , here's how y'all can get them:
- Domain Proper noun
A domain name is your website'southward address, such as blogvault.net. You can purchase a domain proper noun from domain registrars similar Domain.com, Namecheap.com, GoDaddy.com, and Dynadot.com.
- Web Hosting
To host your website online, you demand to get a server. The most popular choice is to sign up with a web host similar BlueHost, HostGator, WPEngine, and Kinsta.
Many platforms like GoDaddy and NameCheap offer both domain registration and hosting together as a starter package which works out bully for beginner sites.
Under hosting plans, the cheapest ones are the shared hosting plans, where your website volition share a server with other websites. While this is an economic choice, it may not be the most secure solution.
If you tin can afford information technology, information technology'south better to opt for dedicated servers or container host solutions similar Convesio.
Here's a list of the all-time WordPress hosting providers to choose from.
- WordPress Installation
Most web hosts make it like shooting fish in a barrel for you to install WordPress on your server to fix upward your site. They either have a one-click installation process, or step-past-step instructions are provided.
You lot can as well follow our guide on How To Install WordPress if you need more data.
Once you've purchased your domain proper name and hosting plan, and set upwardly WordPress on your new server, you can move your WordPress site from localhost to the server.
How to Move WordPress from Localhost to Server
Broadly speaking, at that place are two ways you can move your site to a server from your local device:
- Using a plugin (reliable and error-free)
- Manually (error-prone and risky)
The easiest and safest way to practice this is using a plugin. When you move your site, there are a number of elements at play and the procedure is sensitive. The slightest misconfiguration—even if a single line of code is out of place or omitted — your site won't function.
How To Use A Plugin To Move WordPress from Localhost to Server
In that location are two plugins that tin can make this entire process a breeze: All-in-One WP Migration and Duplicator.
Of the two, Duplicator requires a niggling technical knowledge. All-in-one WP Migration takes away the technical part making it very easy to consummate the process straight from your WordPress dashboard.
Both plugins are as good. It depends on your own preference. Nosotros'll show you how to use All-in-one Wp Migration. Allow's begin.
Step 1: Export your local site
Step ii: Import the file to your live site
Note: All-in-1 WP Migration supports sites that are less than 512mb for free. If your site is larger than that, you tin upgrade to the premium version which is but $69 with lifetime access.
Footstep 1: Export your local site
one. On your local WordPress website, select Add together Plugins. Search for All-in-One WP Migration plugin. Install it and then Activate it.

2. From the dashboard panel on the left, select the All-in-One WP Migration. A menu with 3 options will appear: Import, Consign, and Backup. Choose Export.
iii. The page that opens will give y'all a number of options to export your site. Beginning, there'due south an selection to discover particular text in your local database and replace it with another. You can keep adding as many replace commands as you desire.
And adjacent, you tin also cull Advanced options if you don't want to consign sure elements of your site.

You do non need these options. The All-in-one WP Migration plugin will take care of renaming the elements of the site to the URL that you import to.
These are advanced features that are meant for slightly more experienced users, who may want to customise the migration using these options. Whatsoever modify made here tin affect your user access details for the site. We strongly recommend skipping this, especially if you are unsure about the process.
5. Click on Consign To and a carte will appear. Select File.

That's it. All-in-ane WP Migration will create a copy of your site. The time taken profoundly depends on the size of your site.
6. Once complete, you'll meet an option to Download the file.

Downloading the file will too take a while. An average WordPress site may take 10-20 minutes.
Step two: Import the file to your live site
1. Go to the WordPress installation you lot set with your web hosting provider. Log into the wp-admin and access the WordPress dashboard.
2. Install the All-in-one WP Migration plugin here as well.
iii. Select the plugin and and so select Import.

iv. On the Import page, select Import from to get the aforementioned dropdown menu. Select File.

5. Now cull the file that you just downloaded from the localhost server.
This process volition have a couple of minutes, but information technology'south well worth it every bit the plugin handles all the heavy lifting for you.
The plugin will notify yous when the import is consummate, and you'll be asked to log in to your website.
And that'due south it, folks. Using the All-in-One WP Migration plugin, you take successfully migrated WordPress site from your local server to a alive server.
Now, we understand that there may be reasons you lot desire to use the manual method. Peradventure your site is larger than 512mb or the plugin doesn't support your site.
For those brave plenty to opt for the manual method, follow the steps as explained in our adjacent section.
How to Motion WordPress From Localhost to Server manually (NOT RECOMMENDED)
Circumspection: We strongly recommend using a plugin to migrate your site . The manual method is prone to error and entails a very tedious process. Attempt this method at your own discretion, and only if y'all are comfy using WordPress.
To manually motion your site, you need to practice two things:
i) Drift WordPress Files from your Local site to the Alive site
ii) Drift database from the Local site to the Live site
First things kickoff. Here are the steps to follow to migrate your WordPress files to the live site.
i) Migrate WordPress Files from Local site to Server
You can utilise either cPanel or FTP to upload your files to your new server. Nosotros'll show you how to utilize both tools.
1. Upload your WordPress files using cPanel
2. Upload your WordPress files using FTP
PRO TIP: If you don't know where to observe your WordPress files, they should be in the folder y'all selected when you installed WordPress locally. You lot can search your computer for the wp-config file and find the directory.
one. Upload your WordPress files using cPanel
If your web host grants you access to cPanel:
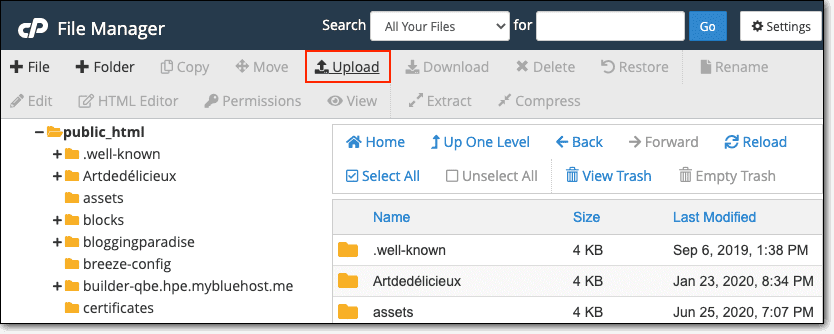
one. Log into your webhosting account, go to cPanel > File Manager.
2. Access the folder called public_html.

3. Here, you tin can Upload your files. You can choose to overwrite the existing files.
2. Upload your WordPress files using FTP
If you don't accept access to cPanel, yous can utilize an FTP customer like FileZilla to accomplish the same goal. You volition need to fetch your FTP Credentials from your web hosting account.
1. Install and open Filezilla on your computer. Enter your FTP credentials – Hostname, Username, Password, Port and hit Quickconnect.

After making the connection, you lot can migrate the WordPress files of your local site to the live 1.
2. In the FTP client, the right panel has the filesystem of your new website on the live server. Select the public_html folder.
The left panel similarly has the filesystem of your local computer. Open the directory where your local WordPress website is installed. Select the local site files and right-click to become the Upload pick.

The procedure will take a while to complete. In the meanwhile, let's get alee and motion the local database to the live site.
ii) Migrate database from the Local site to the Live site
Side by side, you need to transfer the local WordPress database to your server. WordPress supports merely MySQL and MariaDB databases.
If yous take your database file prepare, skip ahead to uploading your database. If you don't have your database, here's how to get it.
Footstep 1: Export Local Database
Step 2: Create a new database on the Alive site.
Step three: Import your local database onto the live site.
Step 1: Export Local Database
First, y'all demand to export your site database. To practise this, you lot'll demand to access phpMyAdmin.
1. Add /phpmyadmin at the terminate of the local website.
For case, if the local WordPress website URL is – localhost:8080
add /phpmyadmin at the end of the URL – localhost:8080/myphpadmin

two. To log in, enter the username root and the password that you use to access your local WordPress website.
iii. Now select your database from the right panel. Choose to Export your database.

PRO TIP: If you don't know your database name, you tin find it in the wp-config.php file.

4. On the Export page, choose Quick – display simply the minimal options and choose SQL format.
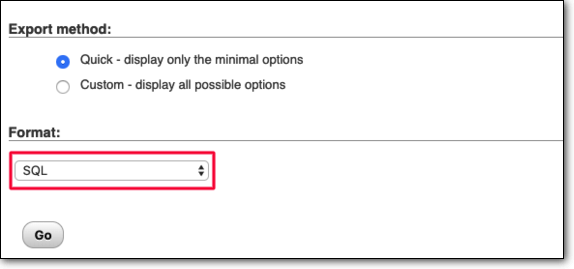
That'll export the localhost database, as a file, to your computer.
Stride 2: Create a new database on the Live site.
In this new database, yous'll upload the localhost database that you merely downloaded.
1. To create a new database, log in to your web hosting account. Go to cPanel. Under the Databases department, y'all'll observe an selection called MySQL Database.

2. Selecting information technology will take yous to a page where you tin can create a new database. Enter a name of your pick.

3. Become back to the same page, scroll down and create a new user. Add together a username and password and store this data safely.

iv. Over again, go dorsum to the aforementioned page and add together the user to the database you lot created.

5. As soon equally you add the user to the new database, yous'll be asked to ready database privileges for the user. You can bank check the All Privileges box or select individual privileges from the list.

Stride 3: Import your local database on the live site.
1. Side by side, from the same cPanel, open phpMyAdmin.
2. Cull the new database and then select Import.

iii. Upload the database MySQL file that you had downloaded earlier. Click on Cull file, select your file and press Go.
That'due south information technology, you lot've successfully moved your local WordPress site to a live server. Only information technology'due south not even so over. At that place are a few details to accept care of.
Recommended Read: Moving WordPress site to new domain
Post Migration Steps While Moving WordPress from Localhost to Server
When you lot migrate to a live server, yous'll likely face up a number of bug. To ensure this doesn't happen, yous need to make sure your configurations are correct.
1. Configure Your New Domain In Database
two. Configure Your wp-config File
3. Fix Your New Domain URLs
4. Test Your New Domain
1. Configure Your New Domain In Database
Later on you import your database, open the wp_options table and select Edit. You lot need to alter the location of your website in this tabular array.
- Locate the words 'siteurl' and 'home'. Edit these two rows.

- For siteurl, under option_value, replace the one-time proper noun with the new domain. Press enter to save.
- Side by side for domicile, echo the same step. Supplant the name with the new domain name and hit enter.
2. Configure Your wp-config File
Yous demand to ensure that your website uses the new domain name and the new database y'all gear up for your site. Y'all can ensure this by editing your wp-config file.
- Go to cPanel public_html and find the wp-config.php. Correct-click and Edit this file. In case you're using FTP, you can download the file. Open it in any text editor to make the changes.
- Find the following lines:
define('WP_SITEURL', 'https://www.instance.com');
define('WP_HOME', 'https://www.example.com');
Make certain instead of case.com, information technology displays your new domain proper name.
- Adjacent, y'all demand to supersede the old database details with the details of the new database you created. You need to enter the database name, database user, and database password.

- In cPanel, close the file to save your edits. If yous're using FTP, re-upload the wp-config file and overwrite the old one.
three. Prepare Your New Domain URLs
Next, you need to prepare your URLs manually.
i. Log into your WordPress dashboard and go to Settings > General.
2. Hither, you lot'll see two fields – WordPress Address and Site Address. Brand sure both these fields accept your new domain name.

3. Ensure the URL doesn't have a slash at the cease. Both fields should end with right TLD such as .com or .co.u.k. or .org.
4. Once washed, Salve Changes.
PRO TIP: Sometimes, you may notice that some URLs haven't been updated. To overcome this, install the Velvet Blues Update URLs on your new site.

In the New URL field enter your new domain name. Make sure there is no abaft / at the stop. Under Cull which URLs should be updated, select all boxes except the last one Update ALL GUIDs. Then select Update URLs NOW.
5. In your wp-admin panel, become to Settings > Permalinks. Select the URL construction you use, this is usually post-name. Select Save changes.
PRO TIP: If y'all're seeing errors, try immigration your browser cache and your website's cache. This will delete any stored information and show y'all just fresh information.
4. Test Your New Domain
Before you launch your site, we strongly recommend running a few tests to brand certain the site is functioning perfectly:
1. Check all your main pages. Make sure none of them have errors.
2. Make sure all your button links or custom theme layouts work fine.
3. Ensure all Logos and Favicon files deport your new domain proper name. You can find these files under Appearance> Theme Options.
4. Check custom card items that you lot can detect under Advent > Bill of fare
five. If you have a WooCommerce site, ensure that your add to cart, checkout, payment gateway, and any other important functions are working properly.
6. You can employ a tool like https://nibbler.silktide.com/ to cheque if in that location are any broken links and broken images, and other errors on your new domain.
PRO TIP: If you're using tertiary-party plugins and services, make sure you change the domain name with them as well.
Bonus: Errors Faced with Moving WP from Local to Server
The reason we've added this section is considering there are many recommendations and solutions out there to move your site from a localhost to a server.
But many of these methods end upwards breaking your site or causing bug with the URLs which stop up in HTTP errors and database errors.
Here are some of the bug you might confront when you effort dissimilar methods, particularly the transmission one:
- Information Serialization
In many programming languages, serialization helps organize data in a style that it has data types and number of elements in every data type.
The problem here is that data including URLs is prepare in physical structures and becomes difficult to move information around. Moving your site means moving data and if you manually modify data such as searching and replacing the domain URLs in your database, you could decadent the serialization and cause errors on your site.
- Errors in WordPress database
While setting upwards the database of your WordPress site, if the database information is incorrect in your WordPress settings, information technology will cause an unresponsive error such every bit Error establishing database connexion.
- PHP errors
A major chunk of WordPress is powered past PHP – a programming linguistic communication that's responsible for the appearance and functionality of your site.
When you move your site to a server, information technology could cause incompatibility issues or exhaust your PHP retentiveness limit. This leads to PHP errors and warning messages showing up on your site.
- Server errors
If your server has a misconfiguration, it volition prevent your site from loading correctly. Y'all'll likely see errors like HTTP 500 Internal Server or the White Screen of Death.
It's best to utilize a WordPress plugin like All-in-ane WP Migration that volition take care of the technical issues for y'all then that you lot don't face these problems.
If you are already facing these issues, follow our guide to WordPress troubleshooting to these set these errors. You can also get help from boyfriend WordPress users on the WordPress Support Forum or popular forums like Reddit, StackExchange, and StackOverflow.
With that, we've come up to the end of our guide on how to motility your WordPress site from localhost to server.
What Adjacent?
Now that your website is online, there are a few steps we strongly recommend to keep your site safe. There are many advantages to moving your site to an online server, just there are serious threats that yous need to protect your site against.
i. Always take regular backups of your website. Things can become incorrect and things will go incorrect at some point. Information technology's best to be cautious and have a safety net to fall back on at all times. You can automate and schedule your backups with BlogVault. When things go wrong, you can restore your site in one click. Check our list of the best backup plugins available.
two. Hackers are always on the cruise and WordPress sites are a lucrative target. To protect your site, yous need a firewall and a security scanner agile on your site. You can install whatsoever i of the security plugins from the WordPress repository. Among these plugins, MalCare is a top performer as information technology automatically installs a robust firewall and scans your site every day. It protects your site from hackers round the clock.
3.Ensure your site is using an SSL certificate and is running on HTTPs and non HTTP. This ensures all data transferred from and to your site is encrypted and safe from hackers.
Apart from this, there are a couple of recommended steps to take when you make your site live. Here are a few articles y'all might find helpful
The Ultimate Guide To WordPress Security
17 steps to take after installing WordPress
12 ways to Harden Your WordPress site
What to Fill-in on Your WordPress site
With that, nosotros end our guide. If you've successfully moved your local site to a server or fixed any errors you were facing using this guide, we're glad nosotros could assist! Give us a shoutout on twitter. We'd love to hear from you lot.
Backup your site With BlogVault!
Source: https://blogvault.net/moving-wordpress-from-localhost-to-server/
Postar um comentário for "Upload My Wordpress Site to Server With a Plugin"